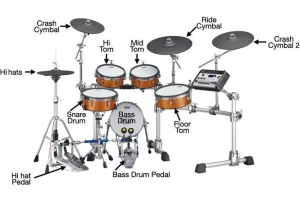
The task of recording drums and miking them requires a lot of work. Getting through this process can be challenging, especially if you are not an expert. There are not only one but several distinctive drum components, each of which contributes a different sound to the recording of a drum set.
Each drum component needs to be configured separately and correctly for the final product to be magnificent in terms of a decent recordable sound.
This guide outlines a step-by-step procedure for setting up the drum’s microphone system to generate a pleasing sound that will wow everyone around.

Making sure the recording room’s acoustics are perfect enough to fulfil the intended goal is one of the first things you must do. It needs to have an ideal sound inclination. To give the sound ample room to reverberate, the room should have adequate size.
The majority of people decide to record their music in unused rooms or garages. The following list of equipment would also need to be ready for recording the drum kit:
- Computer
- DAW
- Sound interface
- Mics (microphones) (microphones)
- Cables for XLR microphones
- Microphone clips and stands
The types of microphones can vary from dynamic ones to condenser microphones.
A Step-by-Step Guide to Microphone Recording
1. Organizing the microphone gain
Set a suitable gain level. The next step is to change the gain on the microphone after you have finished plugging it into the appropriate audio interface channel. The amount of gain or the raw audio signal you would be permitting to be sent to the computer is all this is.
The ideal gain should be sought after; it shouldn’t be kept either too high or too low. An excessive level would result in signal overload. Similarly, too low would mean that the weak points in the signal would not have enough volume to allow for optimal signal recording.
- Put the point of your microphone at the instrument. Then connect the XLR cable’s one end to the microphone and the other to the selected audio interface input.
- Hit the snare drum repeatedly with a steady, regular strike.
- An ascending green LED bar is typically used to display the signal from the audio interface to the channel. When there is no peaking or no orange or red LEDs emanating from the level’s highness, turn the gain knob connected with that channel.
2. Miking the Drum Set
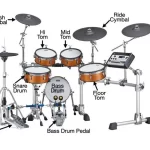
a. The kick drum

Connect an XLR wire to the large diaphragm dynamic microphone. Connect to the audio interface’s channel 1.
If the bass drum has a resonant head, lay the mic halfway within the drum on a towel for a tighter, punchier sound. Focus the mic’s front on the batter’s head being struck by the bass drum’s beater.
Place the mic within the resonant head porthole, facing the beater striking the batter head, for a louder, more resonant sound. Place the microphone a few inches away from the resonant head if the bass drum does not have a porthole. The mic would be more open the farther away it was.
b. The snare drum

Take your dynamic microphone and the XLR cable and attach them. Connect channel 2 to the audio interface after that. Make sure the microphone is positioned correctly so that it enters the snare between the hi-hit stand and the first rack tom.
The mic’s grill should be two inches above the head and an inch away from the edge of the drum. The middle of the drum must be the focal point of the microphone. Then re-set the microphone.
c. The hi-hat

Take your hi-hat microphone and attach the XLR wire to it. Connect the microphone to the audio interface’s channel three right away. Do the proper placing of the microphone such that it points five to seven inches above the cymbal, halfway between the edge and the bell.
Place it so that it faces away slightly from the snare drum on the side from which the drummer is playing. You can reduce the snare sound that is now being picked up.
Reset the microphone.
d. The toms

The toms are connected in a manner similar to how the snare drums are. Set about attaching an XLR cable to each microphone. Connect the toms for channels 4,5, and 6 separately. The high, low, and mid toms are what we refer to as.
The mic should be placed within each tom’s rim and pointed at the middle of the drum head. One of the smallest tom microphones will have a clip that may be used to secure the microphone to the drum’s rim.
Next, proceed to resetting the microphone for each tom, doing it one at a time.
e. Overheads

The standard two overhead mics are commonly connected and combined to produce a stereo image of the drum kit. They are designed to stand two feet apart from the drum set with their heads pointing toward the drums. The overheads are one of the most crucial components of the whole micing setup since they affect how the drum recordings sound as a whole.
One of the most popular types of microphones for this environment is the big condenser mic, which typically needs its kind of external power, or “external power.”
- Connect an XLR wire to each overhead microphone.
- Connect the microphone to the audio interface’s channels 7 and 8.
- Place the first one at 4-5 of the kit’s upper left side. Aim the microphone so that the left side of the drum set is covered and the front is facing down toward the drum.
- Position the second microphone in the same manner, but this time, cover the right side of the drum set.
- Take the extra XLR cable after you are finished setting up the microphones. Stretch the other end of the cable until it touches the first microphone’s grill while holding one end on the centre of the snare drum head.
- If the mic distances are off, modify the mic position or keep them at a constant distance from the snare drum to avoid phase problems.
- Set each microphone gain by repeatedly clapping the drummers’ drums.
The overheads greatly influence the final judgment of the tremendous drum sound and how well it gets through. To achieve the final or desired sound you want to hear at the conclusion of the full installation, you may need to modify it to various heights and placements.
Having Just One or Two Mics? – Here’s What You Can Do
If you are somewhere and only have one or two mics set up, you can experiment with different locations to make it work if you don’t have an individualized strategy for mic settings. Some helpful pointers to remember are as follows:
1. The location in the space
The distance between the microphone and the drums should be at least ten feet for a more ambient sound. You would benefit from having a more polished, audible, and ambient version of the drum sounds.
2. The location of the drum set up front.
No matter how many mics you have or don’t have, placing yourself two feet in front of the bass drum and four feet up in the air will produce the punchiest sound output, and you’ll love it all. It is simple to carry this hack when you don’t have separate mics for each setup.
3. The drummer’s point of view
The viewpoint of the person who will play it must also be taken into account. This position involves being behind the drummer and is designed to look like a drummer’s equipment.
4. One microphone
The absolute last resort should be to utilize this approach or alternative. The secret to recording with a single mic is to experiment until the desired sound emanates from the drums.
In this situation, a big condenser diaphragm microphone would be necessary, and it would need to be set up as an overhead mic and pointed directly at the kick drum beater.
Make a note on the ground where the microphone stand is located and capture a brief portion of the drumming. After that, try moving the microphone a few steps in front of you. Take a brief audio clip of the drumming, then repeat.
Last Words
It’s not necessary to record in a highly technical manner. Just make sure you give it your best shot and keep things hassle-free and enjoyable throughout the process.
The final output in the form of sound would be nothing less than magnificent if you contributed equal timing to setting each of the components. There are no wrong answers, and no one will be evaluating your recording. You have to concentrate and have faith in your abilities to complete the task.
Even a single mic can help you out and create sound at a far more tolerable volume in some unusual circumstances. Prepare ahead of the recording dates, and don’t forget to go for some pre-tests.
For further assistance, check out these videos:


